Wednesday, November 27, 2019

Color Throwdown 571-Sparkly Snow Bunnies


Hello everyone! Amy Rysavy here is our host for week's Color Throwdown challenge! I'm ALLLL about the Christmas card-making right now and these ornaments and colors I thought would make for some really fun cards! The colours for this week are to use pink, greenturquoise and silverRemember we just use generic colors (so any brand/type/whatever you have will work) and you can always feel free to add in neutrals (white/black/etc) to make your creation pop!

If you upload your creation to a public gallery, please use the keyword CTD571, and please use #CTD571 and #colorthrowdown on social media so we can find your gorgeous creations!  When linking up your creation using the linky tool below, please be sure to link your specific post, not a general link to your blog.  All of the "rules" are in the right sidebar, and you can always check there to be sure!

One last detail to remember, no digital designs.  Only digital images that are printed off and colored will be allowed.  Totally digital designs will be removed from the link up.

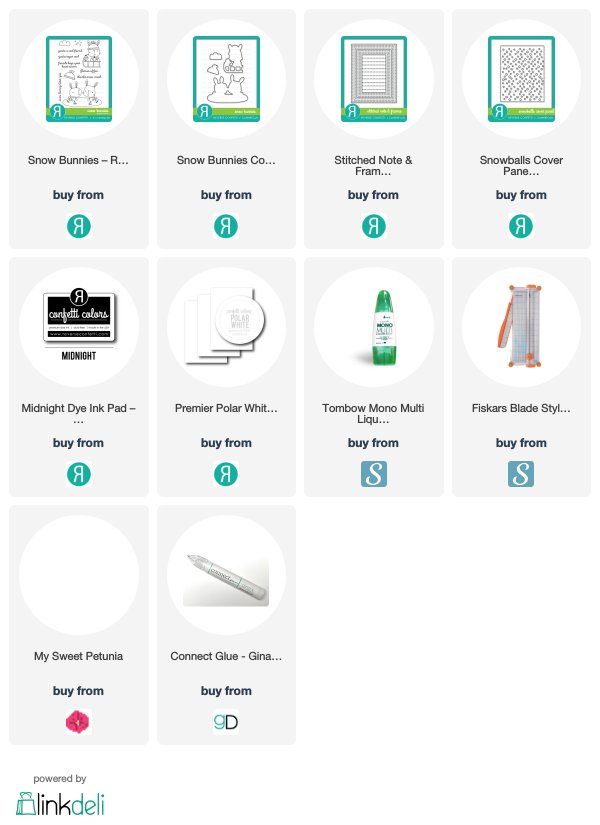
I am obsessed with the silver glitter frame I added to this card. It's such a fun accent. I cut it from the Stitched Notes and Frames Cover Panel.

I layered that over the Snowballs Cover Panel cut with Premium Polar White cardstock. The adorable bunnies are from the Snow Bunnies stamp set. I used the challenge colors in my Copic markers to color the bunnies. I added a few of the clouds and cut out all the bits with the Snow Bunnies Confetti Cuts.

 I stamped the sentiment on a skinny strip of Polar White card stock in Midnight ink. I love how this card came together. It was a nice break from all the Thanksgiving prep I have been knee deep in all week. Did I mention the glitter? gaaahhh! It makes me happy. 


Check out the beautiful creations from the team this week! They are sure to inspire you, they always inspire me!! Have fun creating, we can't wait to see what you come up with.


Photobucket

Saturday, November 23, 2019

Reverse Confetti/ Thankful/ Shopping Code

 We are coming up on to the Thanksgiving Holiday in the US. It's a time for reflection and a time to be grateful and thankful for all the blessings in our lives. The stamping community and Reverse Confetti are certainly a blessing to me.

I colored up the sweet little huggable critters from Huggable with my copic markers and then cut them out with the Huggable Confetti Cuts


After I cut out the critters and sweet little hearts, I set them aside and did a little ink blending for my background. I used Stone and Piggy Bank inks with my Life changing Blender Brushes.

\

 I used a strip of Purple tape to mask off the top and bottom of my panel. I gave it a splattering of white paint and then used Coral ink and Piggy Bank ink to create an ombre sentiment from the Huggable stamp set. 


There is an amazing SALE running NOW in the RC Store. 
We are thankful for our Fetti Fans. 
25% OFF Shop HERE

Image may contain: text

and I will leave you with a few of my favorite projects from this past year. 
I am thankful for all of you, my readers. I appreciate each time  you stop by and each time you leave a comment. Thank you. 


Photobucket

Thursday, November 21, 2019

Inspired By Challenge: Christmas Welcome

Hello and happy Friday! A new Inspired By challenge went live today and I am sharing my card here. Check out the inspiration photo, and my card that follows. 

No photo description available.

As you can see, those stripes totally spoke to me. I pulled out the Big Stripes Cover Panel and cut it from some Polar White Cardstock. I added it to the top of a Midnight top folding A2 card. 

I colored up the pretty wreath from the Joyous Holiday. I colored it up with my Copics and then cut it out with the coordinating Joyous Holiday Confetti Cuts. I stamped the sentiment in Salsa ink. 


Thanks for stopping by today. You can check out more inspiration for the
 Inspired by Challenge over on the Blog. 


Photobucket

Wednesday, November 20, 2019

Color Throwdown 570- Water Colored Winter Clothes


Hello everyone! Wanda is our hostess this week and I hope you enjoy the new color palette of turquoise, orange and gray (or silver if you prefer) inspired by these yummy cookies!

If you upload your creation to a public gallery, please use the key words CTD570, and please use #ctd570 and #colorthrowdown on social media sites. Also, when linking up your card using the linky tool at the bottom of this post, please use a direct link to your specific post, not a generic link to your blog. All the rules are in the right sidebar, so check them out if you're unsure. No digital designs will be allowed - only digital images that are printed off and colored.

I shared this water colored panel on Instagram the other day for #thedailymarker30day challenge. It's by Picket Fence Studios and it's called Winter Clothes Collage. I embossed it in silver before I used my Zigs to water color it in the challenge colors. The frame is from Reverse Confetti (see link list below for affiliate links. thank you so much, if you use mine.) The sentiment is from PFS, also. It's from the Lorynne Girl stamp set. 


I tried to capture the shimmer with the embossing powder in this next photo. I love the extra detail this adds. 


Be sure to check out some great inspiration from the talented design team! We can't wait to see what you create!      

Check out the beautiful creations from the team this week! They are sure to inspire you, they always inspire me!! Have fun creating, we can't wait to see what you come up with.


Photobucket

Friday, November 15, 2019

Inspired By-Garlands Challenge/ Reverse Confetti

Hello and happy Friday! A new Inspired By challenge went live yesterday and I am sharing my card here today. Here is the inspiration photo, and my card follows. 


 I am so happy with how this card turned out. There is just something about using the negative pieces from a Cover Panel that just makes a statement. Here I was inspired by those leafy felt die cut pieces and the colors, so I made my own version of it with Reverse Confetti card stock (in Piggy Bank, Salsa, Mist, and Iced Aqua) with the Leaf Lattice Cover Panel. I cut it four times and used the actual background piece as template to ensure perfect placement of the individual leaves. 


I am still creating holiday cards so I pulled the sweet candy cane image from Joys of the Seasons stamp set. I used my copics to color it up and then cut out the image with the Joys of the Seasons Confetti Cuts. I used foam dimensionals to pop up the candy canes. I stamped the sentiment from Joyous Season in Stormy ink and then added some enamel dots and a touch of clear chunky glitter to give the berries a sugary/icy feel. 


Thanks for stopping by today. You can check out more inspiration for the
 Inspired by Challenge over on the Blog. 


Thursday, November 14, 2019

Picket Fence Studios/ November Release

It's here! The November Release is LIVE from Picket Fence Studios. EVERY month on the 14th, new stamps, dies, and stencils release and this month is fabulous. I have two cards with a good mix of the new products on each card. 

Let's start with my favorite. It's the
 One Year Older stamp set. It's a large set full of beautiful fish images and a great mix of sentiments. 


I started this card with the 3.5 inch Circle Stencil, a Life Changing Blender Brush and some distress oxide ink. Once the ocean circle was complete, I topped it with the new Polka Dot Stencil and swiped on some Glitz Glitter Gel to create some sparkly white bubbles. 


I set that panel aside to dry and then colored up a trio of the adorable fish. I love the details and that the matching One Year Older dies cut them out effortlessly. I added the sentiment from the same set with Intense Black ink. 

The stencils releasing this month are fabulous (aren't they every month?), I just had to ink up the Roses Stencil. I used one of the smallest Life Changing Blender Brushes from the Fine blending assortment. It was perfect to fit into the nooks and crannies of this stencil. 


I then inked up the Blank Journal stamp and added the Art Grows Brain Cells sentiment. I then decided I needed to add a few bits and pieces of art supplies from the awesome new stamp set called, I Work for Watercolor. I just love how it all came together. 


Go see all the NEW PRODUCTS in the PFS store. Always FREE shipping. 
Thanks so much for stopping by. I always enjoy your sweet comments. 


Photobucket

Wednesday, November 13, 2019

The Color Throwdown #569/ Reverse Confetti


Good Morning! Vickie our hostess for this week's Color Throwdown Challenge #569!  This week we are creating with purple, lavender, and green!! 


We are using generic colors, so as long as you use the color values shown, you are all set! As always, please feel free to incorporate any neutrals that you need in your design as well!


If you upload to a public gallery, please use the keyword CTD569, and please use #ctd569 and #colorthrowdown on social media sites. Also, when linking up your card using the linky tool at the bottom of the post, please link to your specific post, not a generic link to your blog. All of the "rules" are in the right sidebar, please check them out if you are in doubt! One last detail to remember, no digital designs - only digital images that are printed off and colored will be allowed. Totally digital designs will be removed from the link up.


As soon as I saw the inspiration photo, I knew I had to color up the beautiful new bouquet from The Best Days stamp set. I heat embossed the bouquet in white embossing powder and then water colored them with my Zig Clean Color Real Brush Markers. 


I did a little ink blending with Seafoam ink in the background ,over the Diagonal Stitched Striped Cover Panel to bring in more of the green from the inspiration photo. I added a border of Royal purple with the Edge Essential Confetti Cuts. I also tied on a sweet little tag for the sentiment cut with the Tag Duo Confetti Cuts.


Check out the beautiful creations from the team this week! They are sure to inspire you, they always inspire me!! Have fun creating, we can't wait to see what you come up with.


Tuesday, November 12, 2019

Reverse Confetti & ThermoWeb Collaboration


I love when two of my favorite things come together. This week, Therm O Web is teaming up with Reverse Confetti to show how great these two company's products can work together. I was fortunate to get to try out (FINALLY) the Gina K. Glitz Glitter Gel and Purple Tape.
I got busy working with the Glitz Glitter Gel right away, so I had time to let it dry while I worked on the bits and pieces. This was so easy to work with and I ended up having two background panels from one swipe of the product. SO I have two cards to share. 


Before I share all the details of the card I wanted to show you my process and how I got my background, sparkly, glittery panels. I tell you I LOVE this Glitz Glitter Gel. I used the white color and it goes on like cake frosting. 

I first cut a panel of Premium Polar White card stock with the brand new Snow Stars Cover Panel. I then cut a piece of Mist card stock a little smaller, 4 x 5.25 inches and used some Purple Tape to hold it in place under the white die cut panel.

With the Mist layer under the Polar White panel, I smeared on the Glitz Glitter Gel with my offset scarper, making sure the gel gets down into the cut out pieces. 


I then carefully lifted the top layer and set the two pieces aside to dry. You can see the Snow Stars detail on the bottom panel and I love it. 


 Here is the first card, with the full coverage of the Glitz Glitter Gel. I added some strips of Salsa, RC Aqua, and Sand card stock and stamped a greeting from the Thank You stamp set in Midnight ink. 


I added a sweet little Birdie Buddie colored with Copics and mounted him onto the branch image. I used the matching Birdie Buddies Confetti Cuts to cut out each image and adhered them to the card front with foam dimensionals. 


My second card uses the negative piece I created with Mist card stock. I added a little frame with the Rounded Stitched Window Confetti Cut in Sand card stock and made a little hill for the stacked Birdie Buddies on the sleigh. 


I used more of the Purple Tape (1/2 in size) to hold my Birdie Buddies Confetti Cuts in place while I ran the die through my die cut machine. 


Here is a closer look at the Glitz Glitter Gel detail and the finished card with the Warm Hugs Confetti Cut


Thanks so much for stopping by today. Be sure to stop by the Therm O Web blog all week to see many more projects from both Design Teams. I'm excited to see what everyone has created. 


Photobucket