
I have a quick photo tutorial for my Rainbow card, so I'll kick things off today with my IT'S GETTING DEEP card.

It's a pretty simple layout. I accented the main ALM image with the new MINI MONARCH BORDER DIE-NAMICS. I do love the tiny circle on this one. I added the sentiment to one of the MINI TABS FOURSOME DIE-NAMICS. My Tim Holtz Tiny Attacher added some simple accent to help make it stand out.
Here's a closer look. I added some Sukura Gel Pen to accent the metal end of the shovel. Oh, and that pretty ribbon....it's the some of the new MFT Grosgrain ribbon in Tangy Orange. Check out all the ribbon colors, HERE.

Now how about my rainbow card? I really had so much fun making this one. I think this ALM-THE RAINBOWS WILL COME, is such a fantastic set. Not to mention, all the sentiment choices if you also purchase the new UMBRELLA STAMP SET AND DIE-NAMICS??!!!
I loved this sentiment, I used it on my card (stamped on a First Place Award Ribbon Die-namics) and decided to make my own rainbow. Quick and easy, thanks to a few fun products.

Supplies needed: Scor-tape sheets, Rainbow Die-namics, and twine.
Here's how I did the rainbow.
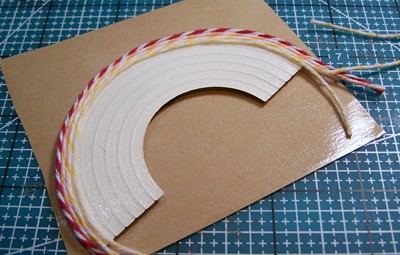
1. Cover a piece of cardstock with Scor-tape sheets. Making sure the piece is large enough to cover the RAINBOW DIE-NAMICS.

2. Run through your die cut machine.

3. Here's the rainbow after it's cut.

4. Add tape (I used Jody Boosters) to cover this side of the rainbow. This is normally the front of the rainbow, but in this case it will be the backside. Take care to make sure your Boosters connect all the pieces of the rainbow, so it will stay together in the finished project.

5. Turn over the rainbow and begin to peel each strip, one layer at a time. Tip: if your cut marks do not go all the way through, you might have a harder time peeling. You can make this work,even if your backing comes off all in one piece. Just take extra caution when attaching your twine in the next step.

6. Add your twine one color at a time. Working in the rainbow order-ROY G BIV (red, orange, yellow, green, blue, Indigo, Violet).
7. I decided NOT to use the full size of the Rainbow Die-namics, so I carefully removed the unused pieces.

8. Turn the rainbow over and trim off the end pieces.

9. Here's the finished twine Rainbow.

And here is a close up the rainbow in action on my card. I added some felt Cloud Die-namics pieces to the ends.

Thanks for hanging with me today! See you back here tomorrow, same time same place!
Here are the details about the upcoming release on March 6th at 10 PM EST:
- You can attend the New Release Party on March 6th from 8-10 PM EST HERE in the MFT forum, where you can enjoy fun, games, and PRIZES!
- The MFT release, including all new stamp sets and Die-namics, is on March 6th at 10 PM EST. You'll find all the newest products HERE at release time.
- The guest designer contest is ON! Check out the forum for details on how YOU can win $200 in stamp sets and Die-namics, and play along with the MFT Design Team for a month.
- If you'd like to see all the teasers for today, please click on over to the MFT Blog NOW. Be sure to leave comments as you go for the chance to win one of 2, $10 gift certificates given away daily. The winners will be posted on March 6th just before the release party, on the MFT blog.


Love your coloring, it's fantastic! And thanks so much for the tutorial on the rainbow!
ReplyDeleteA great idea for a beautiful rainbow.The sentiments in these sets are great.
ReplyDeleteChristine D.
Cute cards Lisa! What a great idea for your rainbow.
ReplyDeleteCute cards Lisa! What a great idea for your rainbow.
ReplyDeleteI love your baker's twine rainbow. Great tuto... I learn something from you today TQ.
ReplyDeleteBoth so fab Lisa and thx for the fab tute!
ReplyDeleteWow- that rainbow is gorgeous! Your card is so sweet, sure to brighten someone's day. Thanks for sharing!
ReplyDeleteI really like how you blinged up the shovel. And showing us how to do the rainbow with the twine. Great idea. ksh
ReplyDeleteBrilliant idea! I love this card.
ReplyDelete--- Connie C.
Such beautiful cards again today! Love that sparkly shovel and the staples on the first card!
ReplyDeleteI actually came over here after midnight and took my time perusing your photo tutorial. I was too tired to post a comment at that time....but what a wonderful idea for the rainbow. I am thinking that this tip could be used for other shapes as well!!!
super terrific cards!..thanks for the tutorial what a fab idea... love the finished look of the twine rainbow!
ReplyDeleteThese are so CUTE and I LOVE the rainbow!
ReplyDeleteVery pretty cards! Love the spica on the shovel and the rainbow is so pretty. Thanks for the tutorial.
ReplyDeleteLOOOVVEEEEE the twine rainbow!!! both cards are AWESOME!
ReplyDeleteYour twine rainbow is sooooo cute! I just love your card...really all of your cards. Every single blog hop post makes me smile! Thanks for the inspiration!
ReplyDeletethis is so cute, thanks for the tutorial, I'm going to have to try that one out.
ReplyDeleteAren't you clever. Thanks for the tutorial. Both these cards are simply wonderful. I'd feel very special if either one were given to me. Just sheer genius.
ReplyDeleteAwesome cards that rainbow is so cool!! Thanks for the tutorial!!
ReplyDeleteThat rainbow is awesome! Nice work!
ReplyDeletelove how you did the rainbow nicely done.
ReplyDeleteWow, what an awesome idea. Thanks for explaining how you did that. It looks amazing
ReplyDeleteWhat a brillant idea with the rainbow. I love you deep dirt card she is very cute.
ReplyDeleteSo cute Lisa! Love the twine rainbow!
ReplyDeleteGreat cards! Love the rainbow!
ReplyDeleteGreat cards, Lisa. So love this cute little digger image and your rainbow is beautiful.
ReplyDeleteSO cute! I **LOVE** your rainbow!
ReplyDeleteFun cards! I really like the rainbow.
ReplyDeleteI LOOOOOOOOOOOVE both of these cards---I esp. love the glittered shovel! I also love that rainbow! BEAUTIFULLY done:)
ReplyDeleteSUPER SUPER ADORABLE CARDS! I just ADORE the twine rainbow! Thanks so much for showing how you made it as well! :)
ReplyDeleteXoXo,
Katie
Adorable cards!! I absolutely LOOOVE how you made the twine rainbow!! SOOOO cute!!
ReplyDeleteLOVE the sparkly spade of the shovel and that twine rainbow is brilliant!!!
ReplyDeleteAwesome cards, beautiful coloring and thank u for the rainbow tutorial, I will indeed use it the next time I make one
ReplyDeleteFAB rainbow! Thanks for the awesome tutorial!
ReplyDeleteAwesome imagination and creativity, love it!
ReplyDeleteLove how you made the shovel look like metal, and thanks for showing how you did that awesome rainbow!
ReplyDeleteI LOVE the sentiment on the first card, and that twine rainbow on the second is awesome! Your color is just right too!
ReplyDeleteOH MY WORD! That twine rainbow is DIVINE! GORGEOUS!!!
ReplyDeleteOMG!! This is TOO CUTE!! THANKS for sharing and have a FABULOUS WEEK!! =)
ReplyDeleteGreat cards. Love how you made the shovel look real and the twine rainbow.
ReplyDeleteI'm so impressed with the rainbow! It's very striking. Thanks for the tutorial on it :-)
ReplyDelete