Wednesday, February 22, 2012

WSC60-You're Tweet

Short and Sweet today...it's VIP day...scrolll down to see my Country Charms VIP post. It is Wednesday, so we can't leave you hanging without a sketch. I was pretty straight forward with my card this week. I did flip the sketch AND swapped out the HOMESPUN BIRDHOUSE for the circle.


Check it out.
I used some pretty prints from the Oct. Afternoon five & Dime collection. The birdie was cut with some MFT felt.  I added the button, because I needed to add a pretty bow somewhere. It fit nicely, all snug in my curved sentiment. I've listed all the Die-namics I used, below....just click the graphics to shop!


And here is the sketch.


  we sure hope you'll play along for a chance at a prize. Have fun.


Kim's Blog has the line up.


Pin It


Photobucket

Tuesday, February 21, 2012

MFT VIP-Country Charm

Howdy, folks! Welcome to the MFT VIP release of the Country Charm collection.  We've got a fun blog hop for you showing off two of the latest Pure Innocence buckaroos as well as a few of the the new Die-namics! Hurry, though....this month's collection is going to sell FAST....they always do!  It is a LIMITED QUANTITY product that gives you the opportunity to purchase upcoming stamp sets and a new Die-namics die TWO WEEKS early.


Pure Innocence Cowgirl stamp set
Pure Innocence Cowboy stamp set
Country Charm Sentiments mini (VIP exclusive stamp set - will never be offered for sale or be available again $9 value, FREE)
Royal Rose Die-namics Die
Country Charms Die-namics Die


Today I'm sharing a little bit of everything. I used each of the new stamp sets, all of the new Die-namics AND the FREE mini set. Hold on to your hats and let's jump right in.

This card turned out WAY CUTER than I ever imagined.  It all started with some older Oct. Afternoon dp, Farm Fresh and the teeny tiny bit of the red gingham pattern I had left (seriously, I only had enough to stamp her vest and the scarf on the cowboy below).  


She's stamped and colored up on x-press  blending cs and then I cut her out. I wanted to show off the fun COUNTRY CHARMS DIE-NAMICS and had fun adding them as embellies to this card.  I thought the WOODGRAIN FENCE DIE-NAMICS was a perfect fit to this country feeling card.  I saw some of that thick twine and right away was inspired to have it hanging from the fence post. Love when I re-discover something from my stash!

The upper corner of this card was missing something, so the GORGEOUS new ROYAL ROSE DIE-NAMICS and that sweet horseshoe charm (spritz with some Mr. Huey Shine to make it a bit mettalic) became the finishing touches. I cut the ROYAL ROSE DIE-NAMICS from some red and white designer paper from the Farmhouse line by Oct. Afternoon.

OMG! this rose is soooo pretty! Check it out. Yes, you need it! It's the latest and greatest in the rolled flower line by MFT.

I also did up a matching cowboy, but changed up the card design. I used lots of the same products which helped this card (and the tag) come together quicker.  I used Jen's Deconstructing sketch for this card. I stamped the sentiment onto one of the SAY WHAT DIE-NAMICS. 

 A cluster of the COUNTRY CHARMS DIE-NAMICS was a fun way to jazz up this country boy. I used some antique brads and MFT Twine (did you see the new colors??? mine are on their way!) 
 Before I send you on your way, I've got one more diddy with product from this month's VIP Collection.  I've been doing up a duo of cards and a coordinating tag for the past few months, and I decided to continue with this again this month.  This tag uses the TAG YOU'RE IT DIE-NAMICS.  There are some cute western images included in the Cowboy stamp set and I thought they'd make a cute background. 
Does the tag look a little different? I made it a little longer using my Banner Extension trick (see the tutorial link in my sidebar), then rounded the corner to finish it off. 
This sentiment comes from the FREE MINI set included in this set.  I just adore those mini sets. It's great to have so many options when it comes to coordinating sentiments! AND it's FREE! You can't beat that. 
I added another REGAL ROSE (adhered it into an antique bottle cap), more COUNTRY CHARMS, and a strip of the POSTAGE BORDER DIE-NAMICS


Have a great night and Happy shopping! Now off you go........

.........Kim's blog has the line up for tonight's blog hop! join us!


Pin It


 ** remember, most Die-namics you can purchase separtely, but I like to show them with the stamp sets, cuz they are soooo GREAT!**


Photobucket

Monday, February 20, 2012

Unity and KOM-Lucky to Have You


I'm up over on the Unity Blog Today!
It's Kit Of the Month Monday!!!
I used this month's kit to make these two cards. 

First one is for this week's SCS CAS challenge-add stitching!
no challenge here!
you know I love sewing on my cards.
I just added a few touches of zig zag on this one, 
kept it simple and masculine.
LOVE the sentiment....hope my dad doesn't take offense!
Ha!

Next is one of my 
FAVE
sentiments
Of. All. Time.
I say this to myself, every time something seems a little rocky in life!
I got some of the new FREE Sale-abration ribbon and brads from SU
and wanted to use them on my card today. 
The sentiment is cut and mounted on a FILE TAB DIE-NAMICS by  MFT.
and I'm soooo diggin' the raindrop background. Way CUTE!


Pin It
Photobucket

Friday, February 17, 2012

Unity and some Friends With Flair

ACK!!!! I've been trying to post this ALL day! Busy day and s.l.o.w. internet connection do not make for fast blogging! BUT HERE it is. 
Today is a GREAT day! I slept in, kiddos are off of school, I got a HAPPY email with some good news, and I'm heading out the door for my first facial with a dear friend!  


I'll continue the goodness and share a little Unity today.  We posted the new monthly theme challenge.  You can check it out here! Play along, use the theme, and you could WIN some Unity!

This month were asked to Use Hearts but NO red or pink! Love and hearts aren't just for Valentine's Day, you know.


I've got two to share. I am having sooo much fun with my new Unity stamps. You can check out all the new CHA Release stamps HERE.
 
I used Everything in Love for this one. I also added in some text stamp  (she art print texture)from the new Christy Tomlison are sooooo fabulous. I love them all, want them all....how about you? What are your faves???


I also used this past week's Ribbon Carousel Challenge.  I love a great sketch, and Danielle came up with this beauty! The pretty oval is the Open Scallop Oval Die-namics by MFT.

This one uses Love is the Tie.....ahhhhh! I love this and would love to blow it up and put it on my wall. It just makes my heart smile! The Authentique stamps are AWESOME!!!!


Don't forget to post your Unity creations to the Friends With Flair post....Friday's are a great day to share what you've been working on. 

Pin It
Photobucket

Thursday, February 16, 2012

Birthday Wishes


I used some birthday money to pick up one of the new Lil' Inkers stamp and die sets.  I just ADORE the giant Flag die included in the set, Flags and Tags (sorry...looks like it's currently sold out-keep checking back for restock). That's really why I got the set, but then I decided I loved the curly label and polka dots, and plaids,  and of course the other fishtail banner die is great, too! 

Some pretty My Mind's Eye paper and a Sweet Sunday Sketch bring this card to life. I decided to add a cardboard butterfly cut with the MFT Butterflies Die-namics.  Some twine and a button finish it off. 

Thanks for stopping by! 

Pin It

Photobucket

Wednesday, February 15, 2012

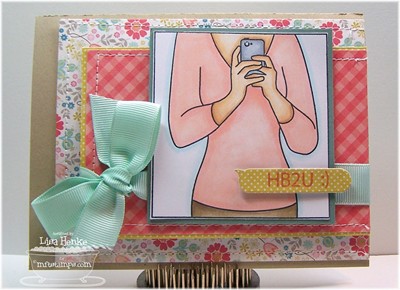
MFTWSC59- HB2U :)

Happy Wednesday.  It's time to share my Wed. Stamp club card with you.  It's always my mid-week pick-me-up, an easy way to get my mojo flowin' AND my MFT stamps inky.  Join in the FUN!

   
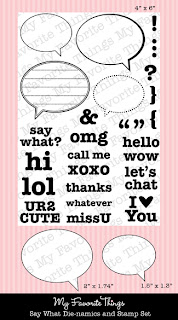
This week I picked up another new MY Mind Eye papers pack and pulled a few pretty patterns to do up the latest WTG stamp-Let's Chat.  In place of the fishtail banner piece, I wanted to add one of the cute CHAT BUBBLE DIE-NAMICS. I used my trick to shorten it a bit, since my sentiment was short and sweet. I REALLY love that there's the smiley face (among others) included in the stamp set. It's fun to add those emoticons to your messages.
She's stamped on x-press blending cs, colored with copics, and I added a touch of Crystal Effects to the little lense on the phone.

The inside was done up to coordinate. I kept a similar layout....helped the card flow  from outside to in.  I also added a PRETTY POSIES Die-namics and another sentiment (from Who's That Birthday Girl) to a full length Chat Bubble Die-anmics.


here's the sketch:


Kim has the line up for today. Come play along with our weekly sketch challenge for a chance to win a Prize from MFT!


Pin It
 

Photobucket

Tuesday, February 14, 2012

MFT Creative Challenge-Babies


Welcome to the February edition of our monthly Creative Challenge.  This month, we're turning to the cute and cuddly, sweet blessings in our lives....Babies!  Yes, we are showing off our baby themed projects. 
I'm sharing a darling altered frame I made for one of DH's cousins.  She recently had her second baby, another boy, and they named him Liam.  I decided a personalized frame would be a special gift and one they could keep on a shelf in the nursery. 

Pin this Project:
Pin It


 I knew I wanted to showcase this beautiful sentiment from the WTG-My How You've Grown set


As my boys grow bigger and older, this has such a deeper meaning.  I stamped it up on the POLKA DOT GREETINGS FRAME DIE-NAMICS. Adding personalization to the frame was  easy to do thanks  to the TYPEWRITER ALPHABET. I stamped the lower case letters from the set onto a few of the MINI PENNANTS DIE-NAMICS  


This frame is then mounted on a burlap Chipboard LAYERED HEART DIE-NAMICS (I used the smaller heart to fit the size of my frame and not hide the letters in the background, so much).


Here's another shot of some of the dimension and texture I added with the burlap, chipboard, and buttons. 


I thought I'd also share how I pulled this frame together. With a few simple supplies, it is easy and will leave you with beautiful results. 

 1. Die Cut the letters. I used BY THE LETTERS  DIE-NAMICS. I picked out my colors, and decided which letters I wanted in which color, and I was able to cut many letters all at once.


2. I cut two hearts, one out of chipboard and one from burlap using the LAYERED HEART DIE-NAMICS. I used a coating of Modge Podge on the chipboard to adhere the burlap.  This kept any adhesive from peeking through the burlap, once it was dry. 

 3. My frame was a cheap, dollar find from Micheal's (I didn't care that it had a slot for a photo, it was going to be covered up.  I rounded the corners of my Vanilla Textured cs to match the corners of my frame. 

 4. I used Acrylic Paint and some Re-inker (SU Soft Suede) to paint up my frame.  A few drops of the ink, until you have the desired color and your paint is ready to go. 

 5. Paint your frame around the edges and on the sides. Make sure you are covering any exposed parts. I didn't bother painting the inside, since it was going to be covered by cardstock. 

 7. I added a subtle scored frame to the center of my cardstock base to use as a guide for my alphabet letters. A scor-pal comes in handy for this. 

 8. Before adhering your letters, line them up where you want them to be. This is my "rough" draft.

Here's the finished frame, again. Pretty cute, huh?

I also made a coordinating card to add to the box before I ship it off. I had a PI, just for the job. This one is BOY AND BABY.  With the help of Karen's Sweet Sunday sketch.....I completed this one in no time.  I used the same colors from the frame and added a few more Die-namics to finish the card. The hearts are my FAVE from HOMESPUN BIRDHOUSE  and the sentiment is the BRACKET TAB DIE-NAMICS.   I even impressed some letters to the background to mimic the letters I used in the frame. 
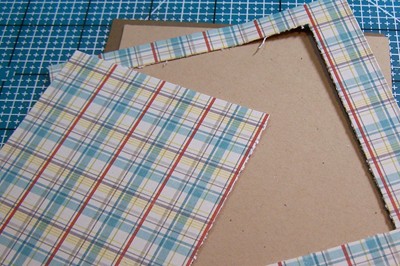
 This card is larger than normal, it's a 5 inch square.  It just about killed me to use a full 4.5inch square of that gorgeous plaid print from the new My Mind's Eye paper pack, Dilly Dally.  Then I remembered an old scrapbook trick.....since most of the panel was going to be covered up, I went ahead and cut out a middle section of the pattern paper.  It helps take out some weight (great when mailing cards) AND it allows me to use more of that print for another project.


I hope you enjoyed my project for this month's Creative Challenge. 


Be sure to hop on over to Kim's Blog to see who is joining me this month. I'm looking forward to seeing what my MFT Sistahs have up their sleeves. 

Pin It
Be sure to click any of the links above, or simply click the graphics below to purchase any of the product I used in today's project.


Photobucket