Showing posts with label creative chat. Show all posts

Tuesday, February 28, 2012

Creative Chat-Ribbon Storage

It's time for the MFT Creative Chat. The My Favorite Things Design Team Creative Chat is a monthly feature, where we are challenged to explore our creative spaces and share valuable organizational methods, tools, and shopping strategies with you. You'll be able to peek into our creative spaces, ask questions, and share your own ideas in the MFT forum.  This month, we were asked the following questions:  

Show us how you store your ribbon.
What are your favorite types of ribbon?
Any tips or tricks on how to use ribbon on stamped creations?

I've taken off the past few months, not joining in on these creative chats.  I love looking into other crafters spaces, and I have gained a wealth of information from my fellow MFT DT members during these chats.

 I decided to join in this month, because it's no secret I ♥ RIBBON!!!  I admit it....I have an obbession with ribbon. Love it, can't have enough of it, and use it on almost EVERY card I create.  
Because of the amount of ribbon I own and how/where I purchase it from, I have quite a few different storage methods to share with you. I hope you'll find some of my storage methods helpful in your ribbon organization. 

Before I get into all of the storage pics, let me quick answer the other two questions of the day.....
My top picks for my fave types of ribbons to use are:
  • grosgrain-solid and saddle stitched
  • gingham (I really love the 3/4 inch width and the 7/8 inch)
  • twill ribbon
  • seam binding
  • twine-bakers twine and burlap twine
But I am open to using any type of ribbon....I'm really not THAT picky! lol!

As for how I use ribbon on my cards.....that's EASY....anyway you can! haha. I do love a great loopy bow! Add a button and some twine and it's even better :)

Soooooo, now Let me start with  my ribbon winding.  I LOVE these plastic spools, by Cropper Hopper.  I use the 3x3 size to wrap my ribbon that does not come on a spool.  The cool thing about this larger size, is they fit 2 side by side in the drawers I have for my storage units.  They are 6inch drawers.  Wrapping ribbon, might seem a little tedious and boring, but I do this task while watching TV with hubby at night.  He appreciates that I actually stay awake. lol!
 I am clearing out the drawer next to this one, to make room for all my LOVELY new MFT Grosgrain ribbon!!!!


Take a look at this ribbon heaven I received today in the mail. Ahhhh! You can check out all the new MFT ribbon HERE....and it coordinates with all the yummy new cardstock!

Go see....but come on back! I'll wait. 

Ok...glad you came back...here's a look at the ribbon cards without being wrapped.  This is the smaller size I use for my twine. 

Here is all my twine, wrapped and stored on a wire ring. 

Another of my favorite "ribbon" is my burlap twine.  LOVE this stuff.....love it! I store these wrapped around wooden spools. I stack them out in the open on a shelf, right at my finger tips. 
 Now on to some of the ways I store my actual ribbons. I am a HUGE fan of plain grosgrain and saddle stitched grosgrain ribbons.  While I love the pretty polka dots, other patterns, and ruffley ribbons, I always fall to this basic style of ribbon. I struggle with tying bows and have the patterns all lay the right way. The solid grosgrain is always easy to tie and make pretty bows with. SOoooooo happy Kim has started carrying this type of ribbon.

One way I store my grosgrain collection is on a paper towel holder. I took this idea from a Taste of Home catalog (I think. it might have been when they were Southern Living at Home).  It's an old paper towel holder. The top screws off, and I slide the spools over the rod.  I do have to use some scissors and make the cardboard spool hole a little bigger, so it can fit over the rod. 

Next up is my FAVE ribbon storage. One of my first trips to IKEA was to purchase these metal kitched rods (Bygel Rail) to hold my punches and then the cooridnating Bygel baskets I just love how the spools of ribbon sit right in front of me and are so easily accessible.

I have two of these baskets and as you can see they hold A LOT of ribbon. I have 15 spools in this one.

Before I send you on your way. I did want to show you one more way I store my ribbon. I adore the pretty seam binding ribbons.  I don't have a ton of it, and I even ae made my own (spritzing with Glimmer Mists).  I bought this particular ribbon and I just LOVE that they came wrapped all pretty on these shipping tags. Such an easy and econmical way to store ribbon.  So I kept them wrapped this way, and decided that this is at least how I'll continue to store my seam binding ribbons.


I sure hope you found my post informative and that you'll feel inspired to share your ribbon storage ideas, or incorporate at least some of my tips.


Visit Kim's Blog for a full list of designers that have taken up the challenge and get ready to delve into the minds of our creative team.


Pin It
Photobucket


Tuesday, November 29, 2011

MFT Creative Chat-Desk and Tools

It's time for the MFT Creative Chat. The My Favorite Things Design Team Creative Chat is a monthly feature, where we are challenged to explore our creative spaces and share valuable organizational methods, tools, and shopping strategies with you. You'll be able to peek into our creative spaces, ask questions, and share your own ideas in the MFT forum.  This month, we were asked the following questions:  


Show us your desk.  How do you have things set up, and why?  
What are your "go-to" tools?  Tell us what you can't live without.

I chickened out last month, but I'm here this time.  My desk needed a good pick up, so this was the perfect excuse.  BUT I thought some of you might like to see my desk on a typical day.  I took a before shot for you. Before, meaning, before I picked up for the rest of the pictures on today's blog post.    

I am NOT one of those people that pick up after each project.  I do put away most major tools, re-stack papers pads, and put away ink pads, stamp sets, and copics.....BUT......scraps, bits and pieces of ribbon, and ALWAYS dimensional backings are left scattered all over.

Let's jump in, I've got lots to share on my desk tour today. Lots of Pictures....hope you likey!

So here's how I work. I have a hand-me-down desk from my DH's grandfather.  I work with everything right at my finger tips and within a 3 foot radius.  It's really kind of funny, how sometimes I have to crawl into my desk chair, stepping over papers, and projects.  I literally use all the space around me, even the floor. LOL!

I have a MS Score board, with  a Scor-pal cutting mat sitting on top.  This is new to me and I'm still giving it a trial run. 

In the top desk drawer is my scrubby pad, and my acrylic blocks.  I also store my watercoloring tools to the back of this drawer.  I used to use them all the time, but since my copics, I rarely reach for these tools.  You'll see I have a collection of acrylic blocks, most of them Unity (I love the wooden handles), but my favorite is the long skinny one from SU (I think it's H). I use it for most of my sentiments.
Directly to my left, in the top drawer is my paper cutter.  I have an older Fiskars Triple track.  You can see the black scoring blade, I keep that on my cutter at all times and quickly can rotate between the cutting blade and scoring blade to score a card base if I need too.

These two, top  drawers are almost always open (at least halfway),  since I use them all the time.

The drawer directly below my cutter drawer is my Corner Chomper drawer.  This drawer used to hold all my SU tools and my circle cutters (Creative Memories).  While those tools are still there, I needed a deeper drawer for these bigger, sturdier tools. Plus I used these Corner Chompers all the time, especially the corner rounder. Love that I can round thicker items (chipboard and double layers of cardstock) with one punch.  I've purchased them all with a 40% coupon!
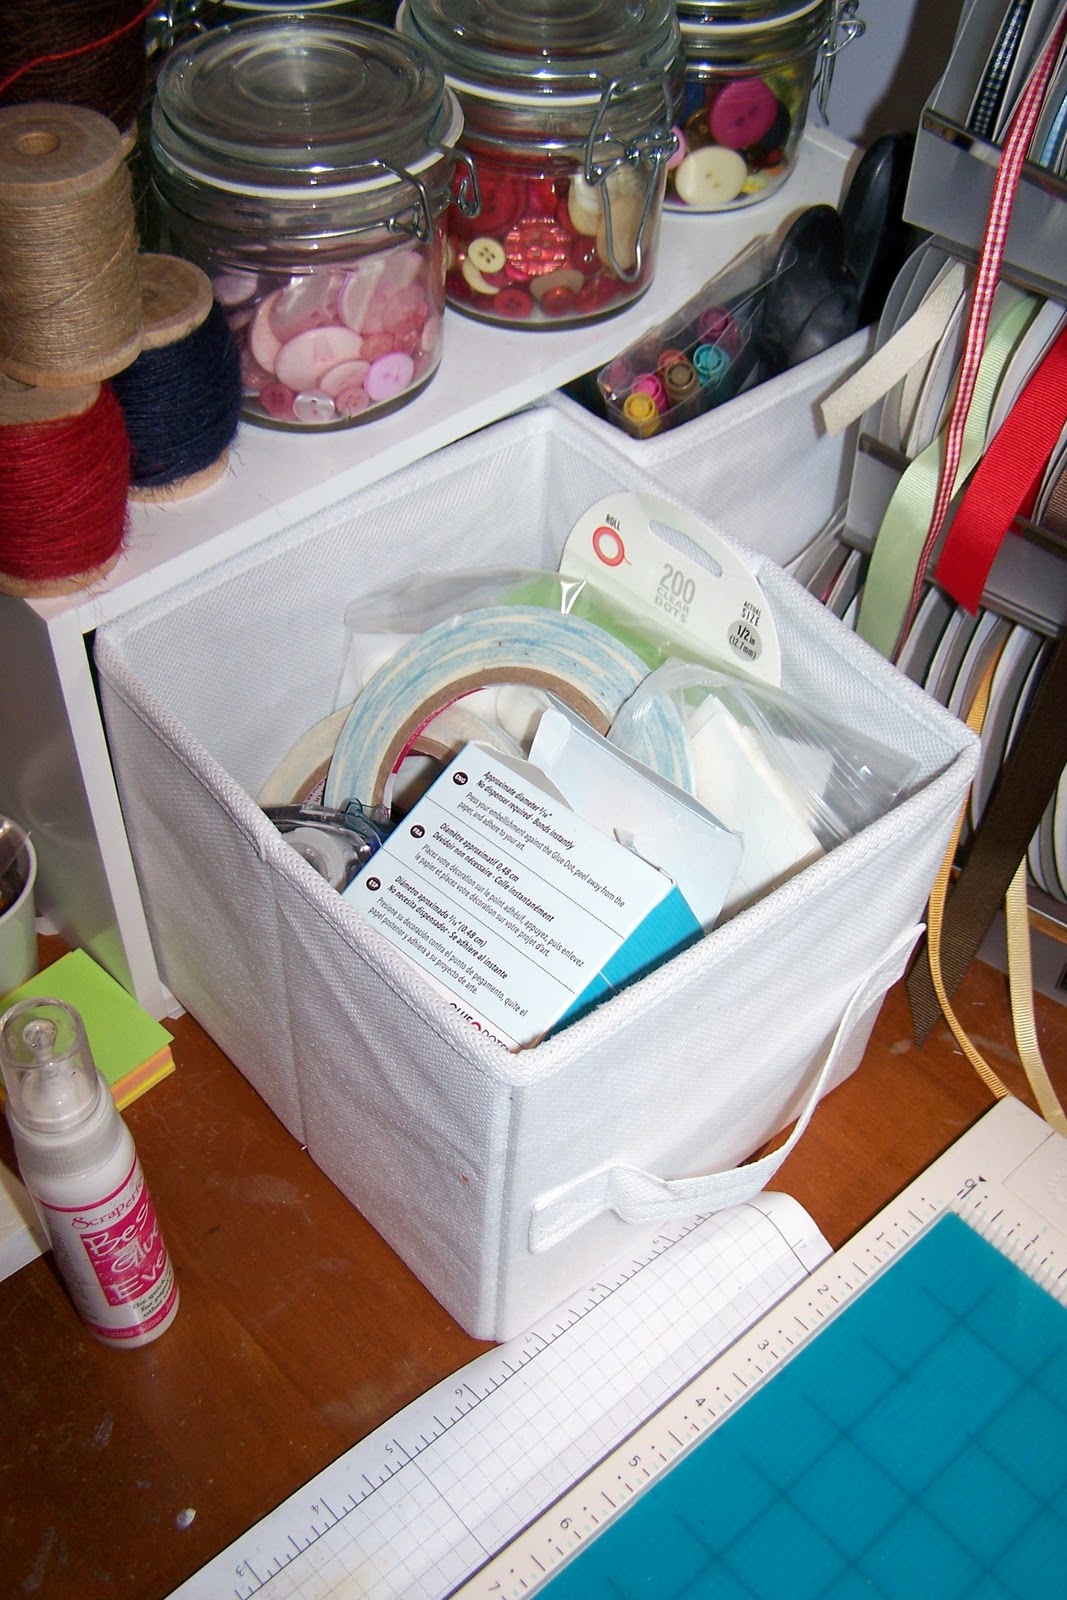
To my left on my desk, I have ribbon (actually you'll see I'm surrounded by ribbon. I have many, many storage options for all my spools of yummy, beautiful ribbon) and one of these craft storage cubes.  It  has a shelf that holds my jute twine, and all my button jars-Two of my 3 most used embellishments!
 I also love that it has two canvas drawers and I have one full of all my adhesives-scor tape, Jody Boosters, snail, mono-multi, Hermafix, and glue dots.  It's all there and I can grab what I need very easily. My most used glue, the liquid kind,  sits out in the open.
The other drawer holds some SU markers, but I also tuck my BELOVED ribbon scissors in there.  I ONLY cut ribbon with these scissors. Am I weird, that I enjoy every little snip I make with these bad boys??? LOL!

Directly in front of me are two Apothecary jars I rescued from my DH's grandma's garage sale. I shove all my ribbon scraps in one and the other holds my sponges.  I add a lot of distressing to my edges, so I have to be able to grab the correct sponge.  I used to use daubers, but recently bought the Tim Holtz blending tool and I'm quickly falling in love with that.

You can also see that my Ott light sits right on my desk as well. I got this one for Christmas last year, finally, and I really don't know how I stamped without one for so long. I need another one to help with shadows, but for now I'm grateful for the one I have.

Directly above these jars, and on the walls are some more ribbon storage and all my punches.  I got some  towel rods from Ikea and the baskets to go with them. While they are pretty, and I love looking at my punches, unfortunatley, I hardly ever reach for those these days.  Thank-YOU die-namics!
Following clockwise on my desk, next up is my copic storage. I use this White Magpie Storage System. I love it and it has a little drawer on the bottom that I use to hold my little ink cubes. 
The upper left corner is a cubby that holds other tools I use quite a bit: sanding blocks (can really extend the life of a cutting blade...just rub and remove any paper fuzzies), adhesive remover, a ruler (drawing in lines or sidewalks to ground my stamped images), a paper piercer, pens, and pencils.
See those two small SU punches....those are probably the only punches I use now adays. One is my horizontal slot punch. Love it for making little knotches for my ribbon to slide through on a cad panel. The other is the ticket corner punch. I dusted that one off when MFT released the ticket die-namics. It's fun to have a matching corner!
I use the top to hold my most used ink pads-momento, and distress inks, and also my Staz-on and Versamark and a few PTI pads I own.
The rest of my ink pads are to my back, on top of another set of storage cubes.  I got one of the SU ink caddy's at the stamp consignment store I teach at (Your Stamping Cottage).  So fun, and I didn't spend a fortune on it. You can see I have easy acces to my stickles and glimmer mists, too.
Back to my desk, on the right side drawers, I store my heat tool and bakers twine.  I wrapped all the twine onto these small ribbon holders and they fit nicely on a giant ring that I hang right on the drawer pull.
I forgot to take a picture of it, but  the second drawer on my right holds all my embossing folders. 
On the floor to my right is the stack of my newest, and seasonal 6x6 paper pads.  I have to see them, to use them, so having them stored in a drawer or box doesn't work for me. When new ones come in, I store them to my left and add the newest batch to the floor. I also keep a small basket filled with all the recent MFT release stamps on the floor (can't show you.....it has all the new Dec. release stamps and you have to wait until tomorrow for the first teaser!). Easy to reach and easy to use.

I also have a sweet little, wooden tool box that the Joshua made me last year in scouts. Joshua decided the boys could decorate it and give it to me for Christmas.  It is one of my prized possesions in my my craft room.  It holds my 12x12 papers that are my current favorites.
The last picture I have to share is the rest of my white scrapbook storage units.  They sit to my left, inside the closet and they hold everything else that I may need. 

Visit Kim's Blog for a full list of designers that have taken up the challenge and get ready to delve into the minds of our creative team.
PLUS....there's a SPECIAL ANNONCEMENT you won't want to miss!

Thanks for hanging with me! See you back here tomorrow for the start of the December teasers!


Photobucket


Tuesday, August 30, 2011

Something new.....Creative Chit Chat with MFT!

MFT has come up with a new monthly feature and we think it's something you'll really enjoy. The My Favorite Things Design Team Creative Chat is a new monthly feature, where we are challenged to explore our creative spaces and share valuable organizational methods, tools, and shopping strategies with you. You'll be able to peek into our creative spaces, ask questions, and share your own ideas in the MFT forum.  This month, we were asked the following questions:  

How do you store and organize your Die-namics?  
Any fun or helpful Die-namics purchasing strategies you'd like to share?  
How do you store extra Die-namics die-cuts? 
I have to admit....I had mixed feelings about this segment. I've never considered myself a very orgnaized kind of person, at least in my craft space. I mean everything has it's place, but my craft room is FAR from clean and tidy. BUT I am always curious about my fellow crafters and their spaces, I LOVE to see where you create. So I thought about it.....hmmmmm, maybe some of you out there would enjoy a peek into my space and can learn something from me and how I organize ( and I use that term loosely, LOL!).
My craft room is also our spare bedroom.  Seriously, the only time it really gets cleaned is when someone comes to visit (usually my parents!).  There was a bit of discussion amongst the MFT DT about cleaning up our spaces to show off our die-namic storage this month.  I dedcided to share a picture of how my room looks most days.  If I'm going to share with you, you might as well see it all....the good, the bad and the ugly. hahaha! Remember.....it works for me!

 So here is how my die-namics are laid out almost all the time.  Right on the bed, open and exposed so I can see them all. Makes it really easy to see what I need at a glance.
Now some more details about how I store my die-namics. I found these great magnetic folders by QuicKutz.  I buy them one at a time with a 40% off coupon from Hobby Lobby.  I HATE spending money on organizational things....I'd rather spend my dollars on crafty items! So I ALWAYS use a coupon when I can. Otherwise I just wait until it's on sale.
I love that I can keep all the dies together and I can close up my folder and take it with me if I need to. This works great for me when I travel to a crop or class I'm teaching.
As my die-namic collection grew (and is still GROWING!!!) I decided to pull out the larger dies (doilies) and lables.  I keep those together in one of the packaging baggies die-namics come in. 
When I do have to clean up my crafty space and clear off the bed so my parents have a place to sleep, I do have a canvas bin (got on sale at Target. I store my MFT stamps in a matching larger bin right next to my desk) that I store the folders in. This sits a desk, right next to my Big Shot.
Here's a full on picture of my die-cutting station.

Do I store my extra die-cut pieces??? I had good intentions and started to put the extras in a baggie, but honestly, I never rarely reach for that baggie. So truthfully, most of the time I just toss my extras. Why waste the time storing the extras when I don't use them?  I like to cut fresh, rather than dig through a bag only to find I don't have what I need.

A couple quick tips about my die-namics.
  1. I always purchase a matching die if there is a stamp set to match. I love that MFT makes that internal debate easy...and sells them together. I would much rather crank an image through my big shot than cut it out!
  2. I try to keep the teeny tiny die-namics hooked together when at all possible or as long as possible. If I seperate the small pieces I'm afraid I'll loose them. I strategically position them on my paper to cut only what I want, therefore not wasting cardstock.
  3. I store similar dies together....you'll see my borders are all lined up in the same folder. The clouds/nature items are stored together, flowers, and branches are near each other, flourishes are together...and so on, and so on.
  4. LABLE your die-namics! I use a copic marker (wait for the ink to dry before storing them) or sharpie to write the name of each die-namic on the back. 
  5. I also like to store my die cutting materials (felt, cork, chipboard, ect.) right next to my big shot.  Again....I like it all to be within easy reach and visible.  If I shove it in a drawer, I'll forget I have it. Here you'll see I keep my felt in a plastic baggie. Hmmmmm, maybe I need another cute canvas bin.
I really hope you enjoyed today's post.  While I had some reservations about what to share and say here today, I'm so glad I did it.  Take what you want from how I store my die-namics.  It works for me!  I can't wait to see what the rest of the team does.  I know I'll pick up a tip or two.... I always do!
Visit Kim's Blog for a full list of designers that have taken up the challenge and get ready to delve into the minds of our creative team!


Photobucket